


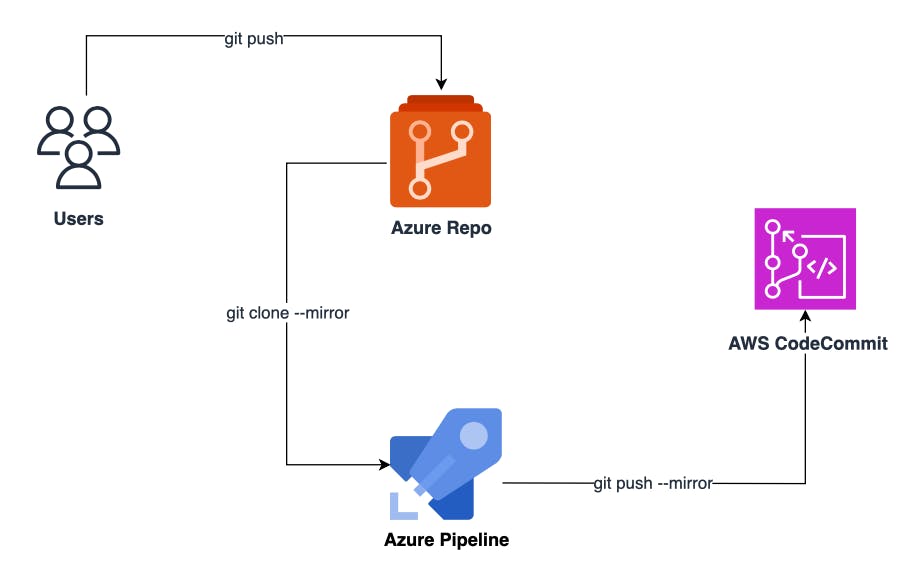
In this blog post, I'll guide you through seamlessly syncing your Git repositories from Azure DevOps to AWS CodeCommit using the power of an Azure DevOps pipeline. This automated setup ensures that your source repository in Azure DevOps and its replica in AWS stay in perfect harmony. Whenever updates are pushed to the source repository, our pipeline springs into action, efficiently cloning the repository and pushing the changes to its AWS CodeCommit replica.
High-level architecture of the Pipeline
To set up repository replication in the AWS Cloud, I'll walk you through the following steps in this blog post:
Establish a CodeCommit repository.
Generate a policy, user, and secure HTTPS Git credentials using AWS Identity and Access Management (IAM).
Craft a pipeline within Azure DevOps.
Prerequisites
Before diving into the process, it's essential to ensure you have the following prerequisites in place:
An active AWS account.
An existing Azure DevOps repository.
Creating a repository in CodeCommit
To prepare your CodeCommit replica repository and obtain its URL and ARN, follow these step-by-step instructions:
Begin by creating a new CodeCommit repository in your preferred AWS region. Pick a distinctive name that reminds you it's a replica or backup repository, for instance, "
my-repo" Please note that you should refrain from manually pushing any changes to this replica repository, as it could lead to conflicts when your pipeline syncs change from the source repository. Treat it as a read-only repository and ensure that all development changes are pushed to your source repository.Navigate to the AWS CodeCommit console.
Select Repositories from the list of options.
Locate your newly created repository and click on View Repository.
Click on Clone URL then select Clone HTTPS This action will copy the repository's URL. Save this URL by pasting it into a plain-text editor for future reference.
In the navigation pane, under Repositories, choose Settings.
Copy the value of the Repository ARN and save it by pasting it into a plain-text editor.
You now have the URL and ARN for your CodeCommit replica repository, which will be essential for setting up the IAM Role and synchronization pipeline.
Creating a policy, user, and Git credentials in IAM
The pipeline needs permissions and credentials to push commits to your CodeCommit repository. In this example, you create an IAM policy, IAM user, and HTTPS Git credentials for the pipeline to give it access to your repository in AWS. You grant the least privilege to the IAM user so the pipeline can only push to your replica repository.
To create the IAM policy, complete the following steps:
On the IAM console, choose Policies.
Choose Create Policy.
Choose JSON.
Enter a policy that grants permission to push commits to your repository. You can use a policy that’s similar to the following. For the Resource element, specify the ARN of your CodeCommit repository:
 {
     "Version": "2012-10-17",
     "Statement": [
         {
             "Effect": "Allow",
             "Action": "codecommit:GitPush",
             "Resource": "arn:aws:codecommit:eu-west-2:<account-id>:my-repo"
         }
     ]
 }
Choose Review policy.
For Name, enter a name for your policy (for example,
codecommit-azure-repo-policy).Choose to Create policy.
Create an IAM user
On the IAM console, choose Users.
Choose Add user.
Enter a User name (for example,
codecommit-azure-devops-pipeline-user).Select Programmatic access.
Choose Next: Permissions.
Select Attach existing policies directly and select the IAM policy you created "
codecommit-azure-repo-policy".Choose Next: Tags.
Choose Next: Review.
Choose Create user.
When presented with security credentials, choose Close.
Choose your new user by clicking on the user name link.
Choose Security Credentials.
Under Access keys, remove the existing access key.
Under HTTPS Git credentials for AWS CodeCommit, choose Generate credentials.
Choose Download credentials to save the username and password.
Choose Close.
Creating a pipeline in Azure DevOps
In order to execute the pipeline discussed in this blog post, which mirrors your source repository and synchronizes it with your CodeCommit repository, you'll need to obtain the following essential details: the URL of your source repository and HTTPS Git credentials. Here's how to do it:
To identify the URL of your source repository and generate the necessary HTTPS Git credentials, please follow the steps below:
Go to the Repos page within Azure DevOps and choose your repository.
Choose Clone.
Choose HTTPS.
Copy and save the URL by pasting it into a plain-text editor.
Choose Generate Git Credentials.
Copy the user name and password and save them by pasting them into a plain-text editor.
Now that you have the URL and HTTPS Git credentials, create a pipeline.
Go to the Pipeline page within Azure DevOps.
Choose Create Pipeline (or New Pipeline).
Choose Azure Repos Git.
Choose your repository.
Choose Starter pipeline.
Enter or copy the following YAML code to replace the default pipeline YAML:
# This pipeline will automatically mirror an Azure DevOps repository in AWS CodeCommit

# Trigger on all branches
trigger:
- '*'

# Use latest Ubuntu image
pool:
  vmImage: 'ubuntu-latest'

# Pipeline
steps:
- checkout: none
- script: |

      # Install urlencode function to encode reserved characters in passwords
      sudo apt-get install gridsite-clients

      # Create local mirror of Azure DevOps repository
      git clone --mirror https://${AZURE_GIT_USERNAME}:$(urlencode ${AZURE_GIT_PASSWORD})@${AZURE_REPO_URL} my-mirror-repo

      # Sync AWS CodeCommit repository
      cd my-mirror-repo
      git push --mirror https://${AWS_GIT_USERNAME}:$(urlencode ${AWS_GIT_PASSWORD})@${AWS_REPO_URL}

  displayName: 'Sync repository with AWS CodeCommit'
  env:
    AZURE_REPO_URL: $(AZURE_REPO_URL)
    AZURE_GIT_USERNAME: $(AZURE_GIT_USERNAME)
    AZURE_GIT_PASSWORD: $(AZURE_GIT_PASSWORD)
    AWS_REPO_URL: $(AWS_REPO_URL)
    AWS_GIT_USERNAME: $(AWS_GIT_USERNAME)
    AWS_GIT_PASSWORD: $(AWS_GIT_PASSWORD)
Add the following variables to your pipeline using the steps below:
| Name | Value | Keep Secret |
AZURE_REPO_URL | Your Azure DevOps repository URL (do not include https://user@) | Optional |
AZURE_GIT_USERNAME | Your Azure HTTPS Git credentials user name | YES |
AZURE_GIT_PASSWORD | Your Azure HTTPS Git credentials password | YES |
AWS_GIT_USERNAME | Your AWS HTTPS Git credentials user name | YES |
AWS_GIT_PASSWORD | Your AWS HTTPS Git credentials password | YES |
AWS_REPO_URL | Your CodeCommit repository URL (do not include https://) | Optional |
Choose Variables.
Choose New Variable.
Enter the variable Name and Value.
Select Keep this value secret when adding any user name or password variable.
Choose OK.
Repeat for each variable.
Choose Save.
Choose Save and Run.
Test the Pipeline
Upon saving the pipeline, it commits the pipeline's YAML file (azure-pipelines.yml) to the root of your primary branch in the source repository. Subsequently, the pipeline will be triggered to run automatically. To confirm the successful execution of the pipeline, follow these steps:
Azure DevOps Pipelines:
Go to the Pipeline page within Azure DevOps and choose your pipeline.
Choose the entry for the latest run.
Under Jobs, choose Job to view the output of your pipeline.
AWS CodeCommit Console:
On the AWS CodeCommit console, choose Repositories.
Choose your repository and choose View Repository.
On the navigation pane, choose Commits.
Verify that the CodeCommit repository contains the latest commit from Azure DevOps.
By following these steps, you can easily confirm that your pipeline ran without issues and that your replica repository in AWS CodeCommit is up-to-date and synchronized with your source repository.
Note: The pipeline runs whenever a new commit is pushed to the source repository. All updates are mirrored in the replica CodeCommit repository, including commits, branches, and references.
Cleaning up
When you’ve completed all steps and are finished testing, follow these steps to delete resources to avoid incurring costs:
On the CodeCommit console, choose Repositories.
Choose your repository and choose Delete Repository.
On the IAM console, choose Users.
Choose your pipeline user and choose Delete User.
On the navigation pane, choose Policies.
Choose your CodeCommit Git push policy and choose Policy Actions and Delete.
Go to the Pipeline page within Azure DevOps and choose your pipeline.
Choose More Actions and choose Delete.
Conclusion
This post showed how you can use an Azure DevOps pipeline to mirror an Azure repository in AWS CodeCommit. It provided detailed instructions on setting up your replica repository in AWS CodeCommit, creating a least privilege access IAM policy and user credentials for the pipeline in IAM, and creating the pipeline in Azure DevOps.